
Applying boiled linseed oil is a simple yet transformative process. To do so effectively, start by using a clean cloth to apply the oil in a smooth, even layer onto the surface. Ensure the oil is absorbed by the wood by rubbing it in gently. Repeat this process until the desired finish is achieved. With the right technique, knowing how to apply boiled linseed oil can enhance the beauty and longevity of your wood projects.

How to Apply Boiled Linseed Oil: A Complete Guide
Welcome to our comprehensive guide on how to apply boiled linseed oil! Whether you are a seasoned woodworker or a DIY enthusiast, knowing how to use boiled linseed oil effectively can enhance the durability and beauty of your projects. In this article, we will walk you through the step-by-step process of applying boiled linseed oil, along with tips, tricks, and important safety precautions.
What is Boiled Linseed Oil?
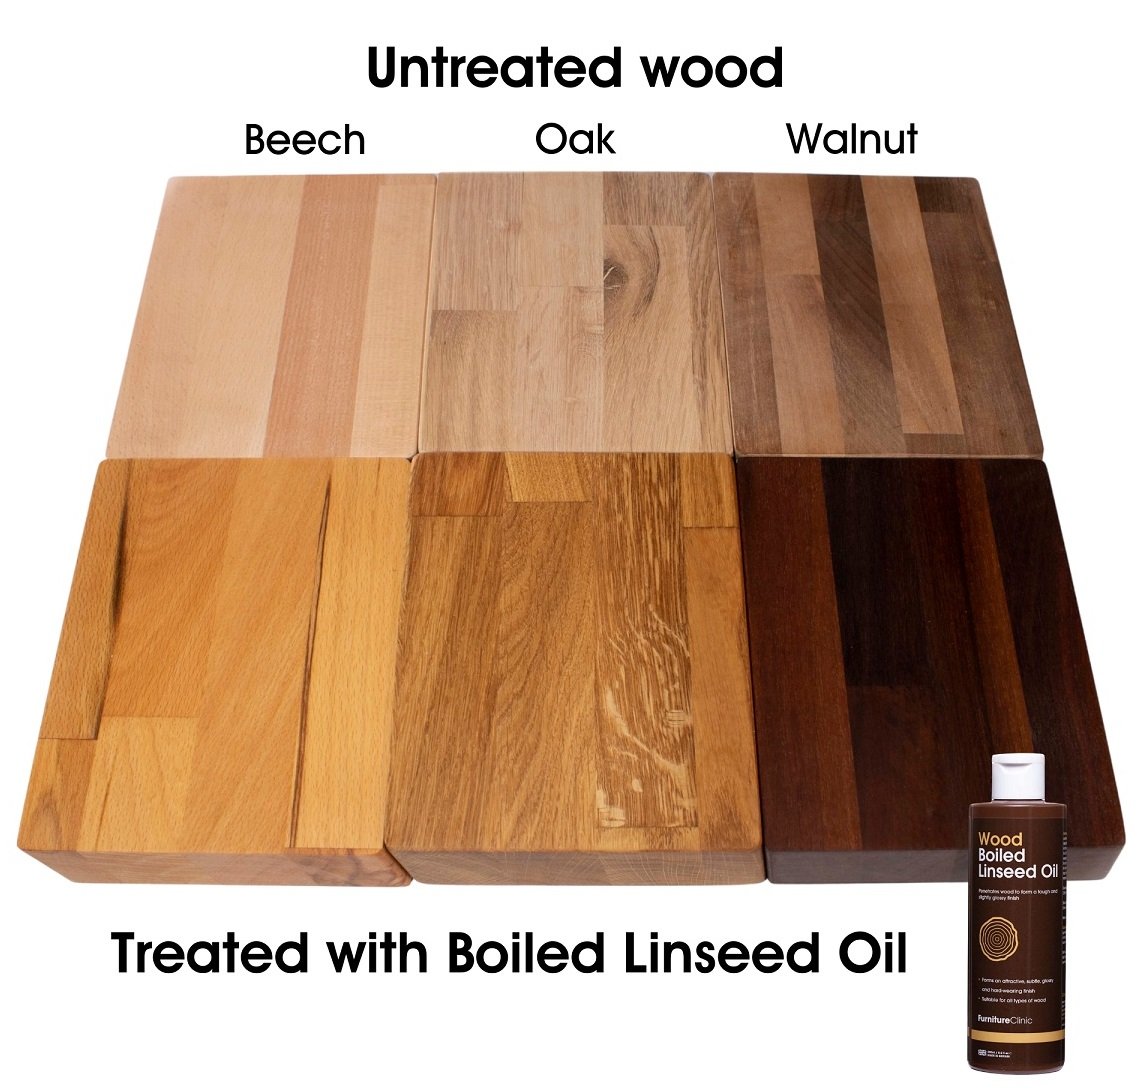
Before we delve into the application process, let’s understand what boiled linseed oil is. Boiled linseed oil is a popular wood finish that penetrates deep into the wood to enhance its natural beauty and provide protection against moisture and wear. It is made by heating raw linseed oil with metallic dryers, which accelerates the drying time compared to raw linseed oil.
Preparation and Safety Measures
Prior to applying boiled linseed oil, it is essential to prepare your workspace and take necessary safety precautions. Make sure you are working in a well-ventilated area to avoid inhaling fumes. Additionally, wear protective gloves and goggles to prevent skin contact and eye irritation. Keep a fire extinguisher nearby, as linseed oil is flammable.
Materials Needed:
- Clean, lint-free cloths
- Boiled linseed oil
- Sandpaper (fine grit)
- Paintbrush or rag
- Work gloves
- Goggles
- Fire extinguisher
Step-by-Step Guide to Applying Boiled Linseed Oil
Now that you are prepared, let’s walk through the process of applying boiled linseed oil to your wood project:
Step 1: Surface Preparation
Start by ensuring the wood surface is clean and free of any dirt, dust, or previous finishes. If the wood has an existing finish, sand it lightly with fine-grit sandpaper to create a smooth surface for better oil absorption.
Step 2: Application of Boiled Linseed Oil
Using a clean cloth or a paintbrush, apply a liberal coat of boiled linseed oil to the wood surface. Make sure to work in the direction of the wood grain to achieve an even finish. Allow the oil to penetrate the wood for about 15-20 minutes.
Step 3: Wipe Off Excess Oil
After the oil has had time to penetrate, use a clean cloth to wipe off any excess oil from the surface. This helps prevent the formation of a sticky residue and ensures an even finish.
Step 4: Repeat Application (Optional)
Depending on the desired level of protection and sheen, you can apply additional coats of boiled linseed oil following the same process. Allow each coat to dry completely before applying the next one.
Step 5: Drying and Curing
Allow the final coat of boiled linseed oil to dry completely according to the manufacturer’s instructions. The curing time may vary depending on the temperature and humidity levels in your workspace. Once fully cured, your wood project will have a beautiful, durable finish.
Tips and Tricks for Using Boiled Linseed Oil
Here are some additional tips to help you make the most of boiled linseed oil:
- For a smoother finish, sand the wood between each coat of oil using a fine-grit sandpaper.
- To accelerate the drying time, place the oiled wood in a warm, well-ventilated area.
- Store leftover boiled linseed oil in a cool, dark place away from direct sunlight to prevent degradation.
- Regularly maintain oiled surfaces by applying a fresh coat of boiled linseed oil when needed.
Applying boiled linseed oil is a rewarding process that can significantly enhance the appearance and longevity of your wood projects. By following the steps outlined in this guide and taking the necessary precautions, you can achieve professional results with ease. Remember to practice proper safety measures and enjoy the transformative power of boiled linseed oil!
We hope this guide has been helpful in demystifying the process of applying boiled linseed oil. Happy woodworking!
How To Use Boiled Linseed Oil On Wood
Frequently Asked Questions
What is boiled linseed oil and how is it used for wood finishing?
Boiled linseed oil is a popular wood finish that penetrates the wood to enhance its natural beauty and provide a protective coating. To apply boiled linseed oil, simply use a clean cloth or brush to evenly coat the surface of the wood, allowing it to soak in and dry thoroughly.
Can boiled linseed oil be applied to both indoor and outdoor wood surfaces?
Yes, boiled linseed oil is versatile and can be used on both indoor and outdoor wood surfaces. It helps protect the wood from moisture and UV rays, making it suitable for various applications like furniture, decks, and woodworking projects.
How long does it take for boiled linseed oil to dry and cure on wood?
The drying time for boiled linseed oil can vary based on factors like temperature and humidity. Generally, it takes around 24 to 72 hours for the oil to dry to the touch. However, it can take up to a few weeks for the oil to fully cure and harden on the wood surface.
Final Thoughts
In conclusion, applying boiled linseed oil is a simple process that can enhance the beauty and longevity of your wood projects. To apply boiled linseed oil, start by wiping the oil on the surface with a clean cloth, ensuring even coverage. Let it sit for about 15 minutes, then wipe off any excess oil with a clean cloth. Repeat this process every 24 hours until the wood is fully saturated. Remember, always work in a well-ventilated area and dispose of oil-soaked rags carefully.