
To draw a boat step by step, begin by sketching the basic outline using simple shapes. Add details like the hull, mast, and sails gradually, focusing on proportions and perspective. Incorporate shading and textures to bring your boat to life. Remember, practice is key to mastering this art. So, grab your pencil and let’s sail through the process of how to draw a boat step by step.

How to Draw a Boat Step by Step
Welcome to our step-by-step guide on how to draw a boat! Drawing a boat can be a fun and rewarding experience for artists of all skill levels. In this comprehensive tutorial, we will walk you through each stage of creating a boat drawing from start to finish. So, grab your pencil and paper, and let’s get started!
Materials You Will Need:
Before we dive into the drawing process, make sure you have the following materials ready:
- Pencil
- Eraser
- Drawing paper
- Ruler
- Coloring pencils or markers (optional)
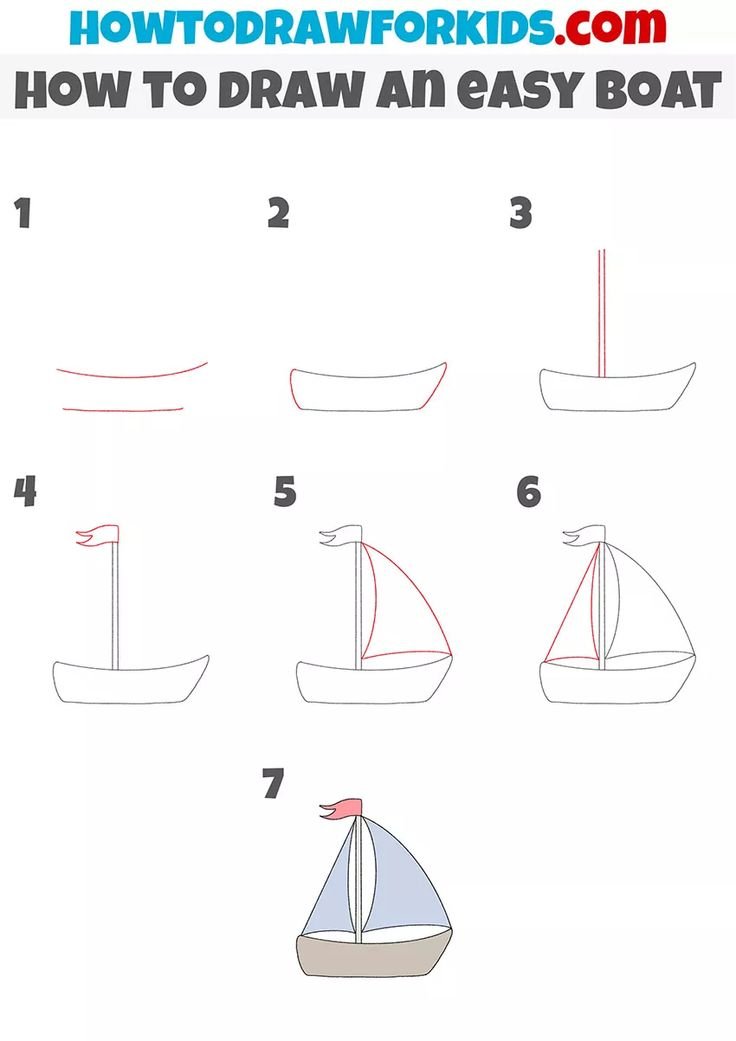
Step 1: Sketching the Basic Shape
Begin by drawing the basic outline of your boat. Start by sketching a long, curved line that will act as the hull of the boat. You can make the hull as long or as short as you like, depending on the size of your boat. Next, draw a smaller, curved line above the hull to create the deck of the boat.
Remember, it’s okay if your lines are a bit wobbly at this stage. You can always go back and refine them later with your eraser.
Step 2: Adding Details to the Boat
Now it’s time to add some details to your boat drawing. Draw a mast in the center of the deck, extending upwards. You can also add a sail to the mast by drawing a triangle shape attached to it. Don’t forget to add a small flag at the very top of the mast for that perfect finishing touch.
Next, draw a rudder at the back of the boat to steer it in the right direction. You can also add windows or portholes along the hull to give your boat some character.
Step 3: Coloring Your Boat (Optional)
If you want to add some color to your boat drawing, now is the time to do so. You can use coloring pencils or markers to bring your boat to life. Feel free to get creative with the colors and patterns you choose for your boat. Maybe you want a classic white sailboat, or perhaps a brightly colored speedboat – the choice is yours!
Step 4: Adding Water and Background
To complete your boat drawing, you can add some water and a background to set the scene. Draw wavy lines under the boat to represent the water it’s floating on. You can also add seagulls, clouds, or even a distant shoreline to give your drawing a sense of depth and perspective.
And there you have it – your very own boat drawing is complete! Don’t forget to sign your masterpiece with your name or initials to mark it as your work of art.
Congratulations on following our step-by-step guide on how to draw a boat! Drawing is a wonderful way to express your creativity and imagination. Remember, practice makes perfect, so keep honing your drawing skills and trying new techniques.
We hope you enjoyed this tutorial and found it helpful in creating your boat drawing. Feel free to experiment with different boat designs and styles to make each drawing unique. Happy drawing!
Thank you for reading!
How To Draw A Boat Step By Step ⛵ Boat Drawing Easy
Frequently Asked Questions
How can I start drawing a boat step by step?
Begin by sketching the basic shape of the boat using simple lines and shapes. Then, add details such as the hull, deck, and mast. Finally, refine your drawing by adding more intricate features like windows, ropes, and other decorations.
What are some tips for drawing the details of a boat?
For drawing details, focus on proportions and scale. Pay attention to the relationship between different parts of the boat to ensure they look realistic. Use reference images if needed to get an accurate representation of features like rigging or portholes.
How can shading enhance my boat drawing?
Shading can add depth and dimension to your boat drawing. Start by identifying the light source and then darken areas that would be in shadow. Use techniques like hatching and blending to create a realistic sense of light and shadow on the boat’s surfaces.
Final Thoughts
In conclusion, drawing a boat step by step allows for a fun and creative experience. Start by sketching the basic outline and adding details like the sail, deck, and oars. Remember to use light strokes initially to easily make adjustments. Gradually build up the shape and features until you have a fully rendered boat. Practice regularly to improve your skills in capturing the essence of a boat effectively. Enjoy the journey of learning how to draw a boat step by step!